|
Amateur technical stuff on building it
I was just thinking, what kind of skills do you
need in order to build a MAME cabinet? Well, for starters, don't let
inexperience scare you off. I'm not embarrassed to say that I'm pretty
light-on for technical skills. My talents lie elsewhere (wherever that may
be) but I don't consider myself an idiot. If you can't do simple maths or
follow wires then perhaps this isn't the project for you. However, common
sense and some idea of how things work will see you through.
I can only speak from modifying an existing cabinet. Seeing as my
woodworking skills are pretty crap, I wasn't interested in building my own
from scratch (although with plans I can't imagine this would be too hard -
all the cuts are straight lines.) For starters you are going to need some
basic tools. Luckily my housemate has a hammer and drill but I keep
meaning to buy my own drill anyway. I had a rotary tool (sometimes called
a Dremel, although mine's a Ryobi), screwdrivers, shifters, a soldering
iron and a borrowed jig-saw. That's about it really.
Research - I can't stress this enough. I spent a good month or so scouring
the web for information on what I needed. And take lots of notes. When I
unplugged the monitor and pulled it out of the cabinet I made damn sure I
knew how it went back in and what plugged in where. It was several months
before it went back in and I had long forgotten which way up some of the
plugs went. My notebook and digital camera were a HUGE help.
The rotary tool is a pretty cool item. Like a power drill but smaller,
it is ideal for sanding back tiny bits of stuff or polishing the burrs off
bits of steel you just drilled or cut. I've used mine extensively on this
project and love it - almost a must-have item.
A soldering iron you could possibly get away without, but if you are
making any alterations to the electrical/power system then you will need
one. Also, make sure you put heatshrink over any of the bare wires you end
up with when you work on the higher voltage lines. You don't want those
things shorting out onto each other or you! Heatshrink is that soft
plastic tubing you can buy that shrinks when heated. You simply cut a
short length of it, slide it over the wire and then solder the wire where
you need it. Slide the heatshrink down over the bit you just soldered and
briefly run the flame from a cigarette lighter over the tubing. It will
shrink and seal over the bare wiring leaving everything neat, safe, and
professional-looking. Buy a few different widths to cater for different
wire and connector thicknesses. |
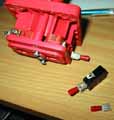 |
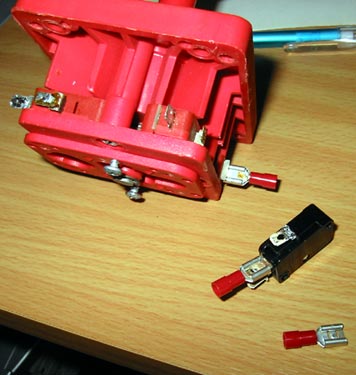
Oh yeah, another thing you'll need is a crimping tool and
some quick disconnects (QDs) - they are also called quick connectors. Here
you can see my MCA-style joystick with a QD stuck on one of the microswitch
lugs. Below that you can see a bare microswitch with a QD on it and at the
bottom is the QD by itself. The ones that fit on a microswitch are female
red spade connectors that are 6.4mm or so across. Jaycar sell them in
packets of 100 (or 8, but you'll need way more than that) and here's a LINK TO THEM. You could go crazy and also buy piggyback versions to run
your ground loop but I wouldn't bother, just crimp two wires into the one
connector instead. |
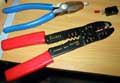 |
Here's my cheap and nasty crimping tool. It came in one of
those super-cheap automotive toolkits that have a heap of tools for A$30
or so. You know they are all crappy quality but who really cares. I've no
idea if my crimper is shoddy or not, but it seems to do the job. Feel free
to use the demonstrated pliers instead. I haven't, but I imagine they do
just as good a job.
So, you just bare the end off a wire and stick it in the red end of the
connector. Stop before it pokes out the other end and crimp that sucker
down. Do it a couple of times and tug on the wire to make sure it's snug.
Why do this? Well, it makes it far easier to change controls if you don't
have to desolder everything. Trust me on this. |
| |