 |
Okay, not much has
been happening lately. I'm still waiting on the gear from the States,
which I was hoping to get a couple of days ago. Ah well, hopefully I'll
see it Monday or Tuesday next week. The last day or two (but mostly today)
was spent investigating the sound system a bit more and cleaning up some
of the crud on the cabinet. It's amazing how much dust is attracted to the
inside of an arcade machine, except of course for all those magnetic
fields sucking it up! :)
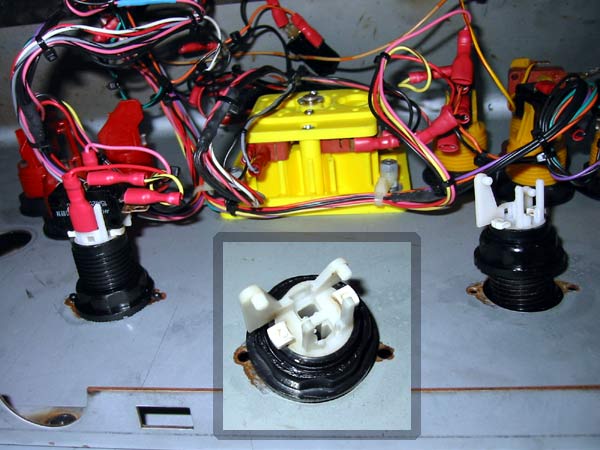
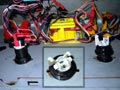
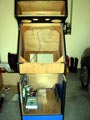
On the left you can see a picture of the inside of the old control panel.
It featured 4 rectangular buttons big enough for bulbs inside (the inset
picture is a close-up of the one on the right.) I plan to use these as
credit buttons (or something - I dunno) so tried taking them off the old
panel. They wouldn't budge. I could loosen off the nut but it wouldn't fit
over the switch holder to remove it. After asking around I managed to
remount the microswitch and use pliers to pull it out of the outer casing. I was worried I'd
break it but it came out cleanly enough. |
And what do you know - only one of the buttons actually
contained a bulb! I'll probably install LEDs instead of the bulbs as they
last longer and use less power. And they are easier to find to actually
buy.
So, I vacuumed all the dust and cobwebs out of the cabinet and now when I
work on it I don't come away with funky black crud all over me. I also sat
down and unwired all the buttons and joysticks from the panel whilst
watching the movie Goldmember (again).
I spent a few minutes the day after desoldering some wires off about a
dozen microswitches. I guess some tech in the past was too lazy to fit
crimps when they did some work on it. |
 |
Hooray! I received my
trackballs and buttons from the US today, along with some weird
brownie-style cookies that taste alright. They are creme-filled and have
"Mardi Gras" emblazoned on them - I'm sure this means something
different to here in Australia where the Mardi Gras is a gay parade. The
trackballs are 3-inch units, one red and one blue. This was done to match
the traditional Marble Madness arcade machine colours. They look and feel
great.
So, I went out and bought the speakers, amplifier and DC power supply and
then returned them a day later. I wasn't happy with how the size of
everything was turning out so I've decided AGAINST running a car amplifier
and will either use a home amplifier that is low profile or build my own
out of JAYCAR parts. I can build an
amp that puts out 175W RMS into a 4-ohm load (115 into 8) for about $400
(plus crossovers.) This is, however, only 2 channels and I'll be feeding
the sub via an inline subwoofer crossover-thingy for 50 dollars more. So,
pre-built and hard-to-find or build it myself? How much talent do I think
I have? |
I spent tonight (now March 6th) looking at the big white steel housing
that holds all the JAMMA gear and power supply stuff. After tracing the
power lines and wondering what I'm going to do with it all I've decided I
can probably mount the 240V-110V step-down transformer up inside the
cabinet nearer the monitor. It only supplies power to the monitor so it
needn't be too accessible and I doubt it will interfere with the tube at
all (I can always put some metal around it for shielding I guess.) My only
real concern is heat, so I might mount it on a metal plate to help
dissipate some it. Anyway, this frees up a lot of space in the cabinet for
computer parts.
I've also ordered all the computer gear tonight so I should get all that
in the next couple of days. If only I could work out what I'm doing with
the audio I could start cutting out speaker holes and mount stuff back in
the cabinet. |
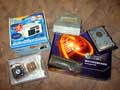 |
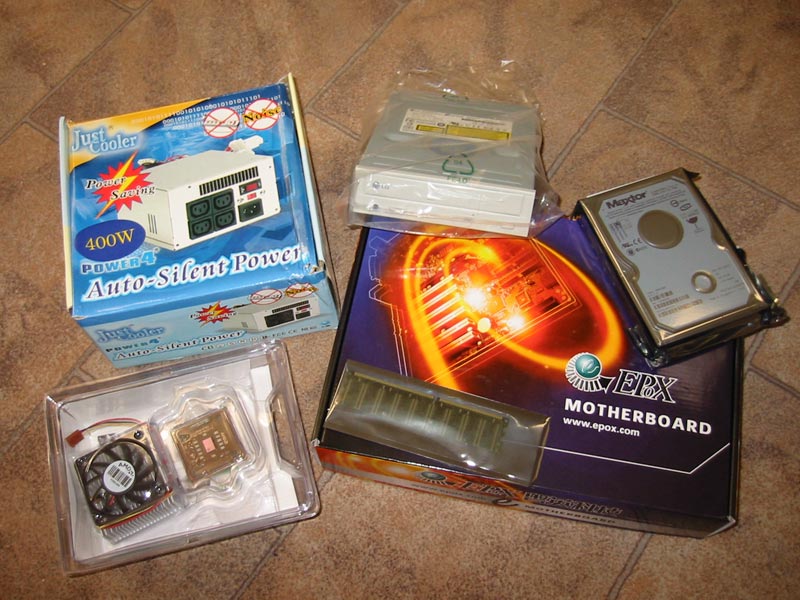
As you can see, I
picked up more PC stuff today. My PS/2 extension cable and Justcooler
power supply arrived from EVERYTHINGLINUX
and I grabbed the motherboard, 60GB hard drive, DVD drive, 256MB PC2700 RAM and
CPU from THE LOCAL COMPUTER SHOP.
The CPU shown here is an XP 2200+ but I'll be swapping that for the 1900+
in my normal PC. I figured if I was going to be buying at least a 1700+
for the MAME machine, why not spend a few more dollars and upgrade my home
system?
The power supply is rated for 400W and is cool and quiet as well. There
are 4 power plugs on the back that come on when the PC fires up so I'll
have those supplying the rest of the cabinet. This way I only have to turn
on the PC and the whole shebang comes alive. Also, the motherboard
supports keyboard power on so it should work out that I can press one
button on the control panel and it all fires up. No need to wire in a
power switch. |
Still not sure about the control panel. I've mocked up the design but I'm
still undecided on what to make it out of. The old one was steel which
made for a light and thin mounting surface, but it is hard to work with.
Perhaps I can find someone to do all the cutting and drilling for me. Then
slap a laminate over the top and I'm done. Maybe.
I've decided to use my old Yamaha receiver for audio. It just about fits
in nicely and since the tuner circuit went belly up I've been thinking of
buying a new one anyway. That will give me about 50W RMS to play with,
which will be ample. I can also buy some shielded speakers from Jaycar to
put in the top, behind the marquee. Unfortunately I can't find a shielded
10" woofer, they seem to top out at 6.5 inches. Maybe I can put in 2
of these instead? Decisions, decisions. |
 |
Here you can see that
I've finally got around to mounting some of the computer hardware. The
motherboard is the only thing that is installed but I've placed the other
bits in various positions to get some idea of where it will all fit. The
keyboard will probably hang off some hooks at the back.
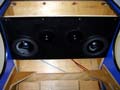
At this point I'm glad I decided to not bother with a sub-woofer as I'm
quickly losing space. Instead I've got 2 shielded 6.5 inch mid/woofers and
2 tweeters mounted in the top. Hopefully these will be punchy enough. I
managed to butcher out some holes for the speakers and thankfully my
handiwork will be hidden by the speaker drivers themselves. It's pretty
hard to cut a decent circle when all you have is a drill, jigsaw, and
Dremel. Especially when you can't get the jigsaw in because of the side
panels. I destroyed a blade for the jigsaw during the process (unforced
error due to inexperience. Sorry Damien, but I bought some replacement
blades to make up for it. Hopefully this won't stop you from lending it to
me again if I need it.) |
I also fitted the network panel on the back, and the hole for that was
truly a butchering! It would have to be one of the worst cutting jobs I've
ever managed. Still, the cover plate hides all that so who really cares?
The plate is mounted high in the back between the two recesses that you
use to drag the cabinet around. I mounted it to one side so that I can
mount another plate with external speaker outputs next to it. Not sure if
I'll ever get around to this but it's nice to have the option.
I'm tempted to just cable-tie the power supply in place by drilling some
holes beside it and running them under the false floor. This beats either
drilling mount holes into the power supply (warranty voided) or building a
plate that it can screw into without blocking the power points. With a
couple of cable-ties and perhaps a few screws put in beside the supply it
should stay where it is.
Only stumbling block right now is a mount for the DVD-ROM drive. Hopefully
I can scrounge up some old PC case bits and make something suitable.
In case you're interested: cost so far is about $2600. Expenses to come
are just for screws and the like, except for the materials to fabricate
the control panel. I'm tempted to try and make the top surface out of
sheet steel. |
 |
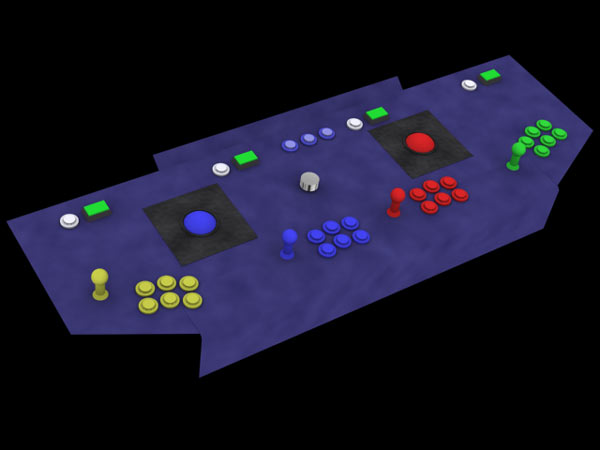
Finally got around to
designing the control panel. Here you can see a 3D model of the first
iteration. That is, I plan on changing the stuff quite a bit before the
final build takes place. At present it is about 1260mm wide, which makes
it just a fraction shorter than our ironing board. Hopefully I'll be able
to squeeze some of the parts together and make it slightly smaller without
cramping it too much. With 4 people standing around it you need room, but
I also don't want it to look like a surfboard :)
I've chosen 2 trackballs and 1 spinner here, but people have commented
(and quite rightly) that there are far more games using more than 1
spinner than there are using more than one trackball. I REALLY want to
play 2-player Marble Madness, but 2-player driving games using the
spinners would be cool, too. I've already bought 2 trackballs and 1
spinner, but that doesn't mean I can't buy another spinner for two of
each. Arrrrgh - I wish I'd thought about this before I ordered stuff from
the US! |
| The image is rendered in 3D Studio Max and all
the arcade controls are to scale and measured in millimetres. To be honest
they aren't too detailed but are excellent for quickly slotting in to see
how it all fits together. I've got better things to do than try and get
screw threads on all the buttons. |
 |
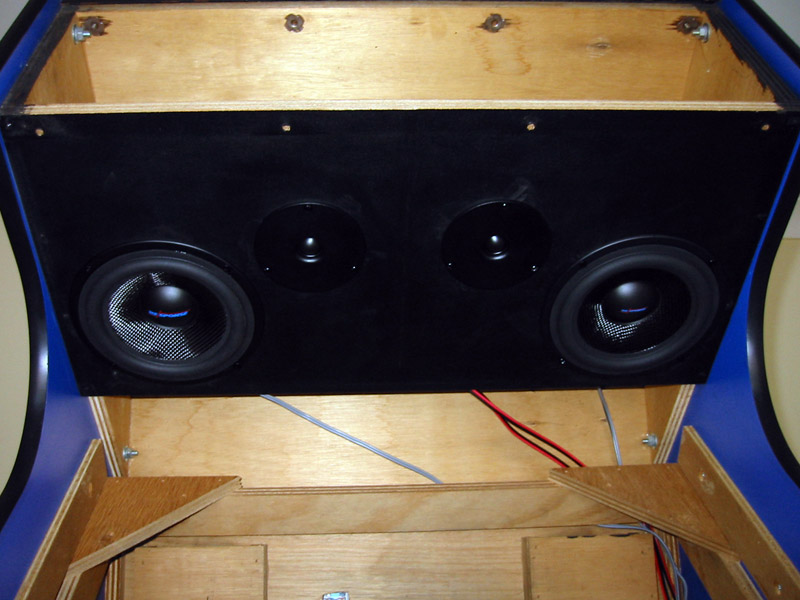
Day off work today. I
felt like it, and I also received my last speaker driver that was on
back-order a day or two ago so wanted to install them all. You can see the
results of my labours to the left there. The mounting isn't terribly sound
from an acoustic point of view (I'm sure it will lose quite a bit of
clarity) but I'm willing to put up with it - depending on how it sounds of
course! There's a capacitor inline with the tweeters and the woofers will
be using mechanical roll-off. Hopefully nothing will explode or make too
much unwanted noise. |
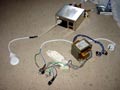 |
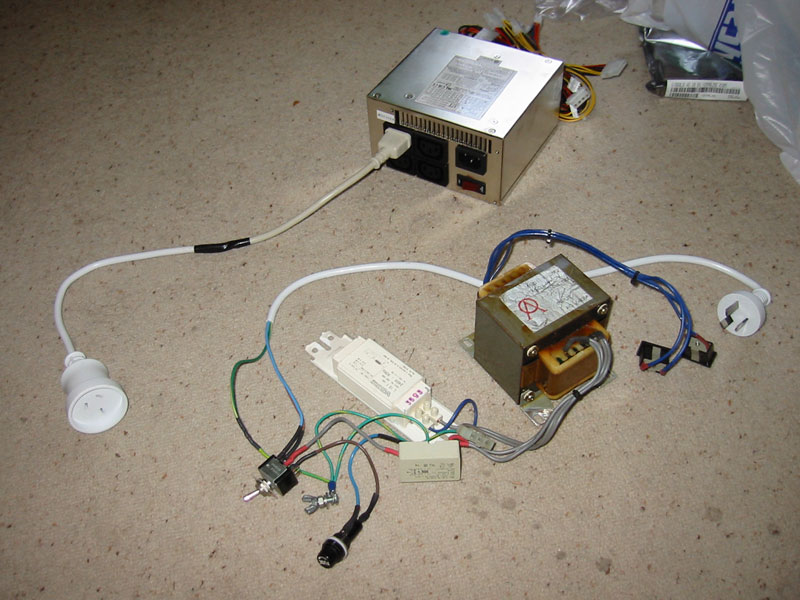
I also spent
today working on the power system. What you see here is a lead I made that
goes from the PC power supply (240V passthrough) to a standard household plug.
This will
supply power in turn to the 240V - 110V transformer that supplies power to
the monitor. The white box is a part of the fluoro tube power system and
just takes a quick bite of the 240V as it passes. I actually have 2
supplies of 110V here so if I ever get some other piece of equipment from
the US I can plug it straight in. There is also a fuse and a power switch
that I've left inline as it came out of the original arcade machine. Can't
hurt to have this stuff still in place. |
So I should be able to have everything come on when the PC turns on, which
will be nice. Lots of people on the Internet have been discussing the best
way of providing a "one button" solution for MAME cabinets,
mostly involving relays to switch mains power when the PC comes up. This
power supply is a god-send, as the 240V pass-through is only live when the
computer is on. Lots of PC power supplies have a plug on the back to
provide mains power but it often stays on all the time.
Not sure quite what I'm going to do with the fuseholder and
power switch. Should really mount them onto a bracket of some sort but I'm
not that motivated. I don't plan on using them that much so I could just
cable-tie or silicon them down. Dunno. In the end I'll probably succumb to
my dignity and make some sort of effort to make it look decent. |