|
Cabinet pretty much done. Control panel being worked on. Newbie technical stuff added
May 2003
 |
I'm pretty much finished
with the cabinet itself now. On the left here you can see a shot of the
interior, with a key telling you what's what. The only things left to do
on the cabinet are cosmetic really - there isn't anything left to do
functionality-wise.
The control panel is in it's final iteration. I've made some drastic
changes to the design and now it is much simplified. I've angled some of
the components and moved them a little, and the panel no longer has the
curved front. This was turning out to be too difficult to mate up to
timber so I've gone for a simple flat piece that hinges on the front. I'm
using some counter-sunk concealed cupboard hinges that should work very
well. This just means I need to have some stuff welded to the underside of
the control panel to mount the hinge to, but that shouldn't be too hard.
|
Speaking of the control panel, I'm getting very tempted to have the whole
thing powder-coated. I need to check on the cost and what sort of
colours/finishes are available but I'm pretty confident about it just by
talking to people who've had things coated in the past.
Once my plans have been checked out by my fabrication guy things should
move along nicely. I'm REALLY looking forward to getting the control panel
done.
Things are
going to be pretty quiet for a while now, as I'm waiting to hear back from
people about fabrication of the steel control panel. Consider this to be
like that time of the year when no-one makes any decent TV shows and you
just get reruns or dodgy "do you remember?" episodes.
So, I'll take this opportunity to do a couple of things. Firstly, I've
spent the evening redesigning the web site so it's a little friendlier and
perhaps more informative. Secondly, I'll feature some images here that are
out of date order of when I did them but are still a part of the project.
Just little things here and there. |
 |
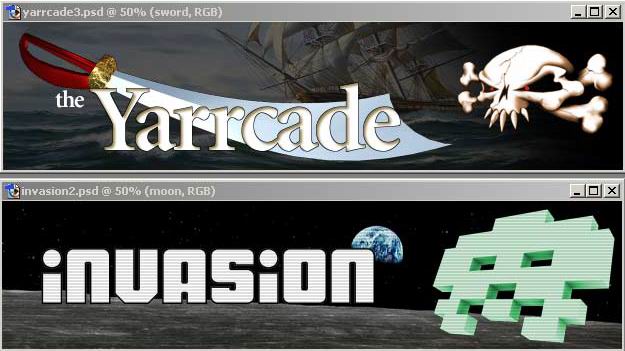
Here's a collage of a couple of the marquee graphics I'm working on. These
are the little images that sit at the top of the cabinet, behind which is
a fluorescent light and the speaker system. I can get images printed onto
transparency plastic to a size of A1 (841x594mm) and get about 4 marquees
in that area (3 the exact size and 1 a few pixels short that should still
fit okay.) So, I still need some design ideas but I can work on it whilst
I wait for the steelwork to be sorted out. |
At the moment I'm working on 600dpi images, so the file sizes are
impressively big (to me, anyway.) The Yarrcade image is a 270MB PSD file
but that will be smaller as a TIFF or something, obviously.
The printing is being done by a local print shop called ABC
Printing (on my last check their web site was woeful - just a
"come back soon!" message) for about A$55. That's not too bad
for full colour - remember I'm getting 4 prints for that price. |
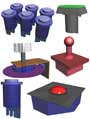 |
Oh yeah, here's a 75k ZIP FILE of the
arcade controls I designed in 3D Studio MAX to help me produce my control panel plans.
Don't expect anything too realistic, but the dimensions are pretty good
(in millimetres.)
These objects will let you see the maximum size of each control so you can
use it to space everything out. I only made objects for the controls I had
but might build more if anyone shows an interest (which I seriously
doubt.) The objects in the ZIP are as follows:
Standard round button, matrix of 6 buttons in arc configuration (that is,
the centre 2 buttons are raised vertically by 7mm), square lit button,
Happ 3 inch trackball (with mounting plate for timber panels), Oscar spinner Pro and the Australian MCA joystick. |
In case you're interested, the spacing of the 6 buttons is as follows:
The distance between each button centre is 40mm, with the 2 centre buttons
raised a further 7mm up. This is a popular configuration, given that the
human hand has a longer middle finger, but I've never really run across a
measurement guide on the web. The distance from the centre of the joystick
to the centre of the first button is 75mm - that's pretty standard for
arcade controls. The distance between the players is up to you and
whatever your panel can accommodate. |
| |